Tag: Arduino

Clothing Tags for Individuals with Visual Impairments

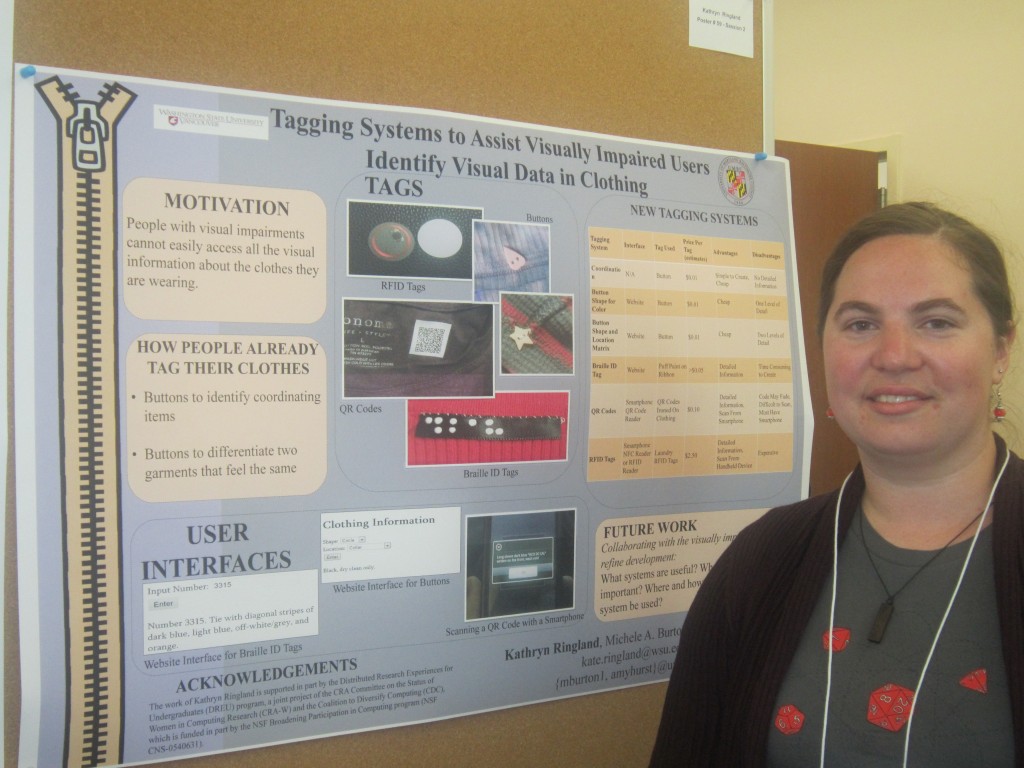
Kate at UMBC SURF Poster Session

August 8, 2012. UMBC SURF Poster Session

Self expression through clothing is inherently visual and is not readily accessible to those with visual impairments. Presently, the best method for conveying information is with high-tech devices that identify fabric colors, but don’t give information about pattern, graphics, washing instructions, or style. Designing clothing tags for the visually impaired user requires that the tags be discreet, comfortable, easy to locate, and that it be reasonably simple to retrieve information from them. With this study we contribute a collection of tagging systems that can be used in future research for the development and testing of fully functional tagging systems that will empower visually impaired users when making clothing decisions.

Ringland, Kathryn. “Accessible Clothing Tags: Designing for Individuals with Visual Impairments”.CHI 2013. Paris, France. May 2013.*

Williams, M., Ringland, K., Hurst, A. “Designing an Accessible Clothing Tag System for People with Visual Impairments”. ASSETS 2013. Bellevue, WA. October 2013.*

Related Posts:

ASSETS 2012 Conference

To be honest, I started this blog immediately after I returned from the ASSETS 2012 conference, but everything else in ...

Week 10

In a whirlwind of getting everything done, the summer is over!  This past week I created a video showcasing all ...

Week 9

I can't believe the summer is almost over!  I guess it's a good sign that I wish I were in ...
Loading...

Week 9

I can’t believe the summer is almost over!  I guess it’s a good sign that I wish I were in grad school now so that I could keep going with my project. The RFID Reader kit arrived, so I was able to put it together and actually get it to scan RFID tags.  The kit was a shield that just plugged into the top of the arduino.  I used the adafruit tutorial to complete the reader and upload the software required for reading the tags.

Reader Kit Unpacked

Reader Kit Unpacked

Breakaway Headers

Breakaway Headers

Soldering the Headers

Soldering the Headers

Soldering Set Up

Soldering Set Up

All Soldered

All Soldered

Reader Assembled

Reader Assembled

Antenna with RFID Tag

Antenna with RFID Tag

Working

And it works!

This week I also found out that I have been selected to present at the Summer Undergraduate Research Festival on campus next Wednesday.  This means I will be giving a 8 minute talk about the project I have been working on this summer.  So, I started working on my talk and a video that I will play during the presentation.


Week 5

This week was a short week because of the July 4th holiday.   I spent the week refining my project.  I put together a list of supplies I would need to build an NFC reader and the tags to put into clothing.  Sadly, a lot of the online stores did not have the components in stock.

In the meantime, I examined an already built RFID reader that was made by another graduate student last spring.

RFID Reader

RFID Reader Innards

It was great to be able to see how someone else put a system together with different components.  This system used a battery, an Arduino Pro Mini, a bluetooth controller, and a RFID antenna mounted on the outside of the box.


I also helped in the production of a tutorial video.  The video is for people who will be participating in a study using an iPhone app called VizWiz.  Learning how to make a video was a lot of fun.  My main role was narration, which was a new experience for me.


Week 4

I cannot believe how quickly this internship is going by!  The first month is already over!  June ended with a severe thunderstorm that left my apartment building without power from 11pm to noon the next day.  The weather certainly is a lot bigger here than in the Pacific Northwest.

Last week, I endeavored to play with my Arduino Uno some more.  I followed through the tutorials first.  This mostly consisted of hooking up LEDs and getting them to do different things (blink and so forth).  It doesn’t sound very exciting, but trust me, it is.  Here are some pictures from the tutorials:

1 LED and Arduino

This was with one LED hooked up. 


3 LEDs

These LEDs were flashing at different rates thanks to the program I wrote.

LED and Push Button

The culmination of the tutorials was to have the LED be controlled by a push button.

After I was feeling fairly confident about working with the tutorial, I moved on to the LCD Screen Kit, kindly provided by Amy.  I was able to get it all soldered together.  And I had it working with the program at first, but then something went wrong and I’m still working on getting it fixed.  It’s taking the input from the computer and garbling it, as you will see in the pictures.

LCD Screen Kit Parts

All the parts to be soldered together in the LCD Screen Kit.

Soldered back of the LCD Screen Kit.

Soldered back of the LCD Screen Kit.

LCD Screen Back

LCD Screen Back

LCD Screen Kit Front

LCD Screen Kit Front

LCD Message Garbled

LCD Message Garbled

There is a bit more work to do figuring out how to ungarble the message.  This week I’ll be turning my attention to RFID and NFC scanners and tags.

Week 3

I spent a lot of this week playing with my arduino kit and researching the things we might use with it.  I began compiling lists of shields that will attach to the arduino to add functioning.  I also looked up tutorials for putting together an LCD kit from Sparkfun.

In my researching, I found a pretty cool blog: Fashioning Tech.  It’s fun to go through the articles and see what interesting other people around the world have been doing with fashion and tech.  Some of the projects are really quite beautiful.  For instance, this article about lace that reads poetry is fascinating.

I think the highlight of the week was learning how to solder from Amy.  I’m going to be using it to put circuits and wiring together, but it’s one of those things that is just good to know for life.  (My dad is very excited that I can now help him with home repairs.)

Soldered Wire

My very first soldered wire.

This coming week, Michele will be back from her conferences in the UK and we will be sitting down on Monday to narrow my project down for the summer.  I’m really looking forward to hearing about everything she learned at the conferences!

Week 2

I can’t believe another week has already gone by!  I guess that’s what happens when you keep yourself busy.  Monday we had our first “Fashion Project” meeting.  We discussed what each of us is working on and plans for the future.  I am working on this project with Michele, the PhD student, Amy, my advisor, and Jeffrey, another undergraduate.

My main task this week was to study up on the arduino and when the kit arrived to start playing with it.  Below are some pictures of the unveiling of my arduino kit when it arrived.

Arduino Kit

Unwrapped Arduino Kit

So many pieces.

Packaging of Arduino "We Love Open Source"

I love the packaging that says “We Love Open Source”.

The Arduino Uno

It’s so little!


Tuesday was an all-hands meeting.  It was nice to be able to meet everyone else in the lab and see what projects they are working on.  It’s also a nice place to get help and coordinate on skills.

Wednesday I volunteered at the NCIL Conference in Washington, D.C. at the Grand Hyatt.  I was there to help assist in the e-voting that was taking place for NCIL’s board.  The e-voting system was being run by a group from Clemson and is meant to be accessible to everyone.  There is an article about it on Clemson’s website, if you’re interested in learning more about it.

This coming week I plan on taking the plunge and getting my arduino to run with my laptop.  I have all the software installed, I just need to load the sketches and go.  Hopefully, I’ll have some success to report on that front next week.

© 2024 Kate Ringland, PhD

Theme by Anders NorenUp ↑